What’s the drill?
You’ll need
- Something to mark lines (for example, chalk, masking tape, or rope)
- Cones (optional)
- Tennis balls
- Small boxes

Before you begin
- Use the safety checklist to help you plan and risk assess your activity. Additional help to carry out your risk assessment, including examples can be found here. Don’t forget to make sure all young people and adults involved in the activity know how to take part safely.
- Make sure you’ll have enough adult helpers. You may need some parents and carers to help if you’re short on helpers.
Setting up the areas
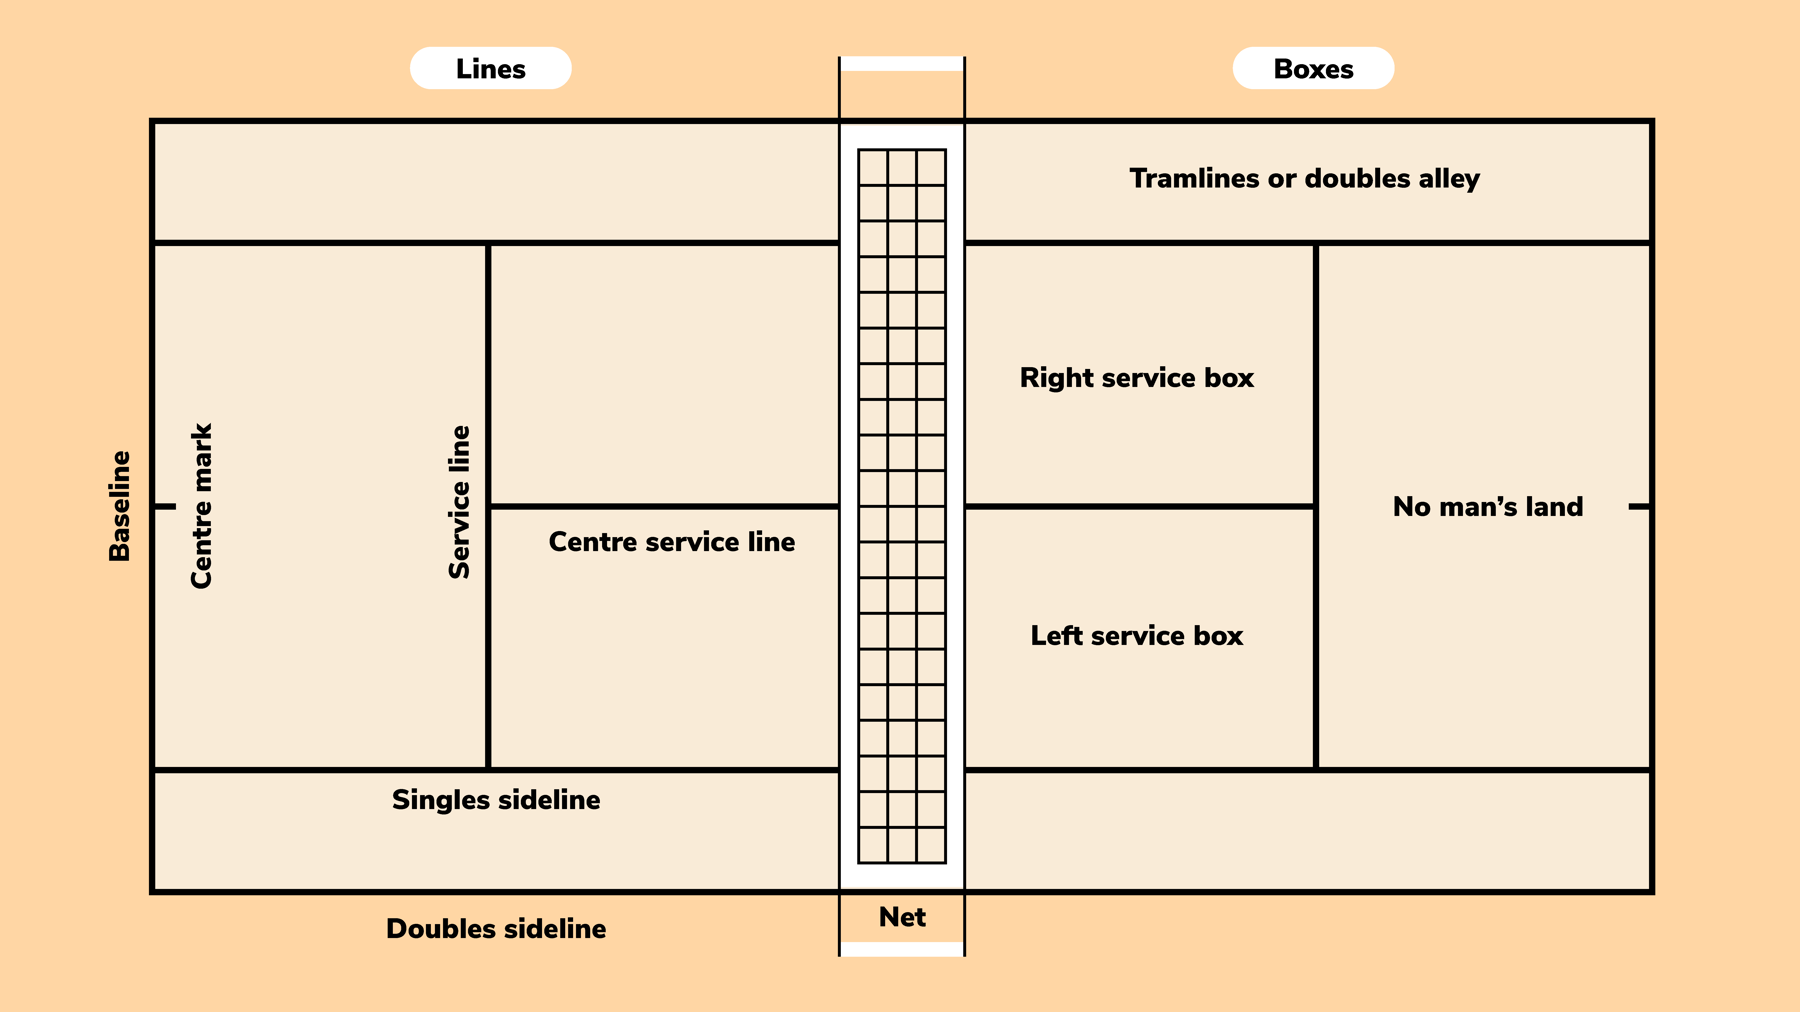
- In one area of the space mark out one half of a tennis court, as drawn above, using chalk, masking tape, or rope. Make sure it isn’t a trip hazard. This is for the ‘Line time’ drill.
- In another area of the space, create a winding path using cones or chalk. These should be spaced quite closely together so that people have to use good footwork skills to navigate through them. This is for the ‘Weave your way’ drill.
- Split your remaining space in half by marking out a line in the middle using chalk, masking tape, or rope. This is for the ‘Box the bounce’ drill.
- This activity works best when the three bases are run at the same time.
Get ready to play
- Everyone should split into three groups.
- Each group should go to a different base and complete the activity.
- After 5–10 minutes, the person leading the activity should tell everyone when to move on and complete their second and third base.
Line time
- Everyone should start the game outside the half court marked on the ground.
- The person leading the game should explain what each part of the court is called and when it’s used.
- Check that everyone understands the court by standing on different lines or in different spaces and asking everyone to call out the name of the place they’re standing.
- When everyone is confident with how the court is labelled, call out a line or space name. Everyone should stand on or in it.
- The person leading the game should continue calling out different lines or spaces until it’s time to move on.
- Baseline: this is the back of the tennis court, and any shots that land beyond this line are out of play.
- Service line: this is halfway between the baseline and net, and served balls must land inside (or on) this line and the centre service line of the correct service box.
- Centre service line: this divides the space a player can serve into in half.
- Left and right service boxes: a player must serve the ball into their opponent’s service boxes. A player should serve the first ball of a game into the left service box on their opponent’s side of the net. Players switch between the left and right box each time they serve.
- Net: this splits the court in half, dividing a player’s area and their opponent’s area.
- Singles sidelines: these are the side boundaries for any singles game of tennis.
- Doubles sidelines: these are the side boundaries for any doubles game of tennis.
- Tramlines or doubles alley: this is the space between the singles and doubles sidelines which players can use during a doubles game.
- No man’s land: this is the space between the baseline and service line. Players avoid standing in this area as it’s too far from the net for volleys and too close to the net for groundstrokes.
Weave your way
- Everyone should line up behind the first cone or marker.
- The person leading the game should call out a way of moving, such as ‘jogging’, ‘hopping’, ‘walking backwards’ or ‘side shuffling’.
- The first person in line should begin weaving through the path of cones or markers using that movement.
- After the first player has moved at least several metres, the second player start weaving through the path. Remind everyone to stay a safe distance apart as they do this, so no-one bangs into each other or trips up.
- The person leading the game should change the way of moving regularly.
- Everyone should continue playing until they’ve weaved through the path two or three times.
Box the bounce
- Everyone should get into pairs.
- One half of each pair should stand on one side of line, and the other person in the pair should stand opposite them, on the other side of the line.
- Each player should get their own box, such as a shoebox, empty square food packaging, or a plastic container.
- Each pair should get one ball. You could use tennis balls, soft balls, ping pong balls, or whatever you have access to. Think about whether they’ll be easy to clean.
- The person leading the activity game should call out different ways for pairs to throw and catch their ball, such as ‘right-handed’, ‘left-handed’, ‘both hands’ or ‘overhead’.
- One member of the pair should throw the ball over the line and the other half of the pair should try to catch it within one bounce.
- In tennis, players have a maximum of one bounce of the ball on their side of the net to return it to their opponent’s side.
- The catcher should throw the ball back over the net so their partner can have a turn at catching it in their box.
- Everyone should continue repeating steps five to seven until it’s time to move on.
Reflection
At the end of the session, ask what skills each base developed and why these skills are important. You could chat as people do some cool down stretches. People might suggest that:
- Line time helped everyone identify the different areas of a tennis court, and move confidently between them.
- Weave your way helped everyone develop their footwork. Tennis involves lots of small steps (unlike the long strides people use in sports like rounders or football), so it’s important to move quickly while staying balanced and focused on the ball.
- Box the bounce helped everyone practice hand-eye coordination. The one bounce rule in tennis means it’s really important to watch where the ball is travelling – players need to react quickly to return it to their opponent.
Ask everyone to think of some other games they could play to develop these skills. Are there any other sports that use similar skills?
Safety
All activities must be safely managed. You must complete a thorough risk assessment and take appropriate steps to reduce risk. Use the safety checklist to help you plan and risk assess your activity. Always get approval for the activity, and have suitable supervision and an InTouch process.
- Active games
The game area should be free of hazards. Explain the rules of the game clearly and have a clear way to communicate that the game must stop when needed. Take a look at our guidance on running active games safely.
- You could make Line time competitive: anyone who moves to the wrong line or space is out of the game and should stand outside the court. The winner is last person left on the court.
- A large box with a wide opening will make Box the bounce easier. For an added challenge, use smaller boxes that are different shapes.
- You could add a competitive element to Box the bounce by seeing which team can catch the most balls within one bounce in a row. What’s your group’s record?
- Make sure that the court in Line time and path in Weave your way are suitably spaced for everyone, including people who use mobility aids.
- If anyone finds hand-eye coordination difficult, use large, colourful soft balls and large, deep boxes in Box the bounce.
All Scout activities should be inclusive and accessible.
Follow this warm up with a Tiny tennis tournament.

