Emoji maps
You’ll need
- Pens or pencils
- A4 paper
- Scissors
- PVA glue
- Glue sticks
- List of emoji's or symbols
- Digital map of the local area
Before you begin
- Print out copies of the map of the local area, so that there is one for each group.
Run the activity
- The person leading the activity should ask the group what they know about maps. See if anyone has followed or created a map before. Find out what map signs and symbols the group know.
You can also ask any older members of the group if they use maps on their phones. - The person leading the activity should then ask everyone what it would be like to go to a new place without a map. See what they would do if they couldn’t ask for directions or read the road-signs. Ask how they would find their way around.
- Everyone should read the story of Nabila from the ‘Emoji map stories’ sheet. The person leading the activity should ask what the group would do in Nabila’s situation and how they would feel in a strange, new place.
- Everyone should split into groups of between four and six. The person leading the activity should hand out the list of emojis or symbols for different places and copies of the map of the local area.
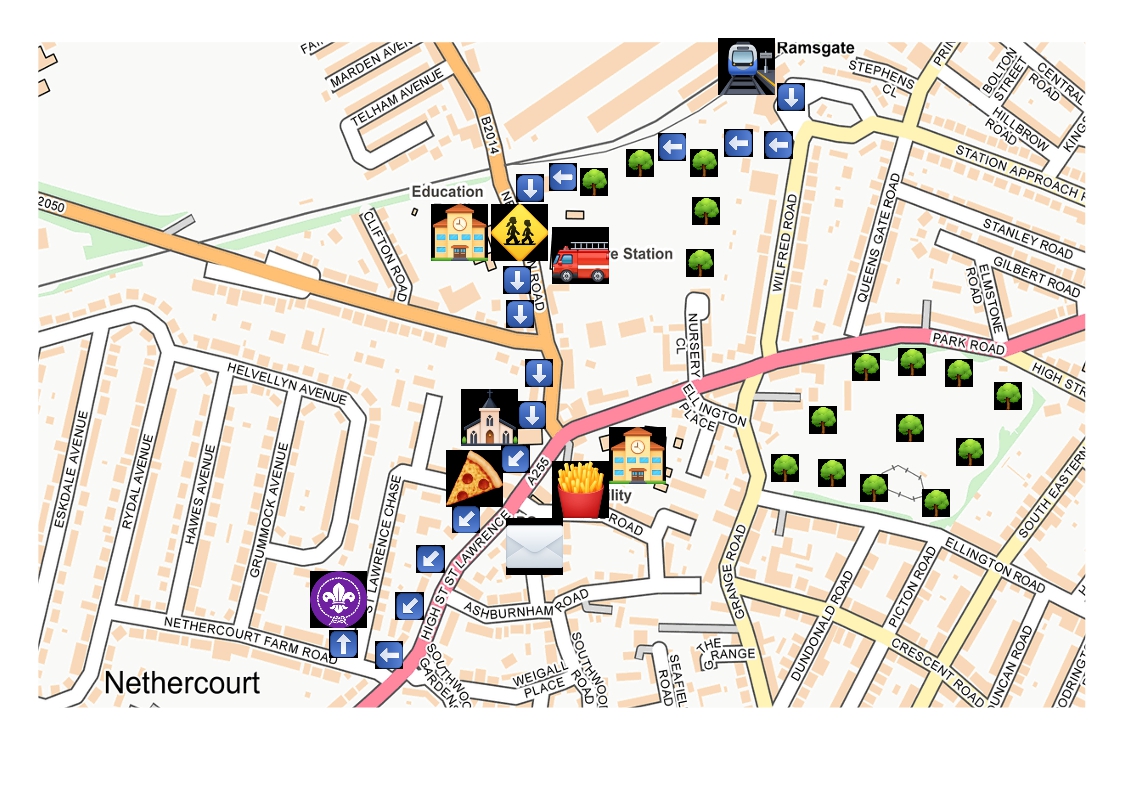
If you struggle to find good quality symbols online, use common tracking signs or Ordnance Survey symbols. - Each group should draw a map of the route from the meeting place to a local landmark, using the copy of the local map and the symbols. Symbols can either be drawn or cut out and stuck onto the new map to indicate the meeting place, the landmark and everywhere in between. Everyone should think carefully about the features on the route that might help someone get their bearings if they were new to the area and using the map.
Use the Example map with emojis photo below to help. - Everyone should come together again to share the maps. The person leading the activity should ask everyone what symbols were used, what landmarks were shown on the route and which maps were the easiest to understand.

This activity helps contribute towards some of the UN's Sustainable Development Goals. Find out more about the SDGs, and how Scouts across the world are getting involved.




Reflection
The group have looked at the challenges of finding your way in a new place. How did the stories of the displaced children like Nabila make the group feel? How do the emoji maps help with the problems that children Nabila face? Why were they necessary
Safety
All activities must be safely managed. You must complete a thorough risk assessment and take appropriate steps to reduce risk. Use the safety checklist to help you plan and risk assess your activity. Always get approval for the activity, and have suitable supervision and an InTouch process.
- Scissors
Supervise young people appropriately when they’re using scissors. Store all sharp objects securely, out of the reach of young people.
- Glue and solvents
Always supervise young people appropriately when they’re using glue and solvent products. Make sure there’s plenty of ventilation. Be aware of any medical conditions that could be affected by glue or solvent use and make adjustments as needed.
- Outdoor activities
You must have permission to use the location. Always check the weather forecast, and inform parents and carers of any change in venue.
Older groups who are familiar with maps could include common Ordnance Survey symbols as well as emojis, to make more detailed routes. They could also plan a route around via-points or away from closed roads.
Younger groups may find it easier to plan a circular or shortened route.
If a group is unfamiliar with the local area, find a map of another area that they are familiar with (e.g. somewhere they might have visited, like London) for them to plot their route.
All Scout activities should be inclusive and accessible.
Plan a walk using the maps that the groups have made between your meeting place and the landmark. Each group should use another group’s map and try to reach the destination by using the symbols to get their bearings.
Discover more at https://www.savethechildren.org.uk/
