Build teeny tiny twig rafts
You’ll need
- Scissors
- String
- Natural materials (for example, leaves, twigs, feathers)
To watch in full screen, double click the video
Before you begin
- Use the safety checklist to help you plan and risk assess your activity. Additional help to carry out your risk assessment, including examples can be found here. Don’t forget to make sure all young people and adults involved in the activity know how to take part safely.
- Make sure you’ll have enough adult helpers. You may need some parents and carers to help if you’re short on helpers.
Planning this activity
- It’s up to you whether the person leading the activity prepares the materials before everyone starts, whether everyone collects their own materials, or whether the group collects as many materials as they can and then shares them out.
- Choose an appropriate outdoor area such as outside your meeting place, a nature reserve, woodland area, riverside, canal, or park. If you’re going to meet at a location other than at your usual meeting place, make sure parents and carers know exactly where you’ll be, what people may need to bring, the day, the location, and what time to drop off and collect everyone.
- Make sure everyone knows to come dressed for the weather. Don’t forget to check the forecast and be prepared for it to change.
- It’s important to check the sunset times, making sure that you’ll have sufficient light throughout the activity. It’s best to run this activity on lighter evenings, such as in summer.
- Remember to have suitable supervision, an InTouch process in place and activity consent forms. It’s important to make sure that anyone with medication, including an inhaler, brings it with them and gives it to a volunteer, too.
- Make sure the area you visit is accessible for everyone, choosing a suitable place for drop off and collection. You may need to think about avoiding steps or steep gradients or including frequent breaks.
Introducing the space
- Everyone should head out to the outdoor space or meet at the chosen venue if you’re collecting the sticks together.
- Explain the boundaries of the playing area and where the no-go zones are.
- Tell people how they can use the space respectfully, without disturbing the wildlife or other people enjoying the site if you're in a public space. Remind people to be calm and quiet, so you don’t disturb wildlife, and not picking any flowers or plants. They should handle wildlife gently, take litter home and put things back where they were found to make sure wildlife isn’t harmed or damaged.
- Tell everyone where adults will be around the site and what people should do if anyone in their team needs help. This should include setting memorable spot where an adult will stay at all times.
- Explain the signal to stop and how long the activity will go on for. A long blast on a whistle works well as a signal to stop the activity.
- If playing in a public space, young people should be paired up so no young person is left alone and they should run or move together.
Collect your materials
- Everyone should collect eight sticks or twigs that are roughly the same length. They should also collect two slightly longer twigs, and one thin twig. You may want to think about which woods float best – lighter woods such as cedar usually float better than heavier woods such as oak.
- Gather some fallen leaves or petals – these will be the flag on their raft. They may want to make the flag out of paper instead.
Build your teeny tiny twig rafts
- Head back to the meeting place with the sticks if you’re collecting them. You may want to run this activity over two weeks, with one week to collect the sticks and one week to make the rafts.
- Gather everyone in a circle and tell them you’re going to make tiny rafts out of twigs.
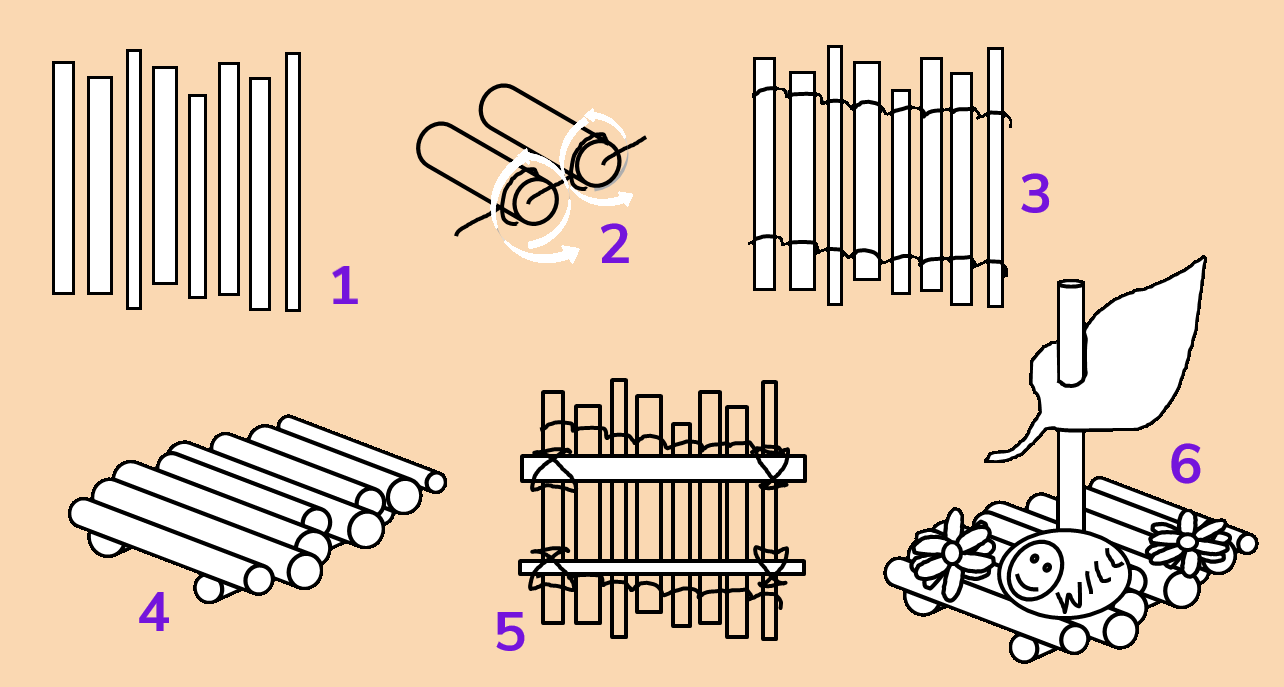
- People should take eight sticks or twigs that are roughly the same length. They should also collect two slightly longer twigs, and one thin twig. They’ll also need to cut six pieces of string, each around one metre long.
- Carefully line up their eight same-sized twigs, side by side. This is the deck of their raft.
- Next, wind a piece of string around and between one end of each twig. They should do this following an under and over pattern, going under the first twig, over the second, under the third, and so on.
- When they reach the final twig, everyone should tie a knot to fix that end of the deck in place. The clove hitch knot is great for this, as it’s quick, adjustable, and easy to untie.
- Repeat steps 5 and 6 to secure the other end of the deck.
- Lay one of their long twigs at each end of the raft – they should lie the opposite way to the rest of deck. Use the rest of the string to attach these twigs to the deck. A diagonal lashing is great for this.
- Everyone should carefully slot their thin twig upright in the middle of their raft. This is their flag pole.
- Finally, people should attach their flag, which could be a leaf, petal, or paper flag, to the flagpole by poking the flagpole through the flag.
Set sail with your teeny tiny raft
- When everyone’s ready, it’s time to test the rafts by floating it in a small shallow pool of water, such as a washing up bowl filled with water. Does it float? Is it ready for a bigger journey?
- Everyone should make any adjustments they want to their rafts before racing them.
- Now it’s time to set sail. Everyone should let their rafts go across a bigger area of water, such as a paddling pool. You could see how well they sail, and whether they can carry any items with them.
- If you’re doing this by open water outside, make sure to be careful near the water’s edge. Any rafts that aren’t made entirely from natural materials should be removed to avoid littering, if it’s safe to do so.

Reflection
This activity helped you to value the outdoors. Did you enjoy being outside to gather twigs and sail your raft? Was it easy to find materials in outdoor spaces near you? Did you use all natural materials to make your raft? Why is it best to take rafts away with you if they’re not made entirely of natural materials? Were you safe near natural water sources? Did you feel confident and comfortable in the outdoors?
This activity also gave you a chance to solve problems. Did you try more than one way of weaving the twine and tying knots? Which ways worked best? Did you make your raft alone, or did you need a friend to help? Did you find any problems when making your raft? How did you solve any problems you found? If you were going to make a bigger raft, to carry a person, what materials would you use (logs and rope for the deck, and empty barrels for buoyancy)?
Safety
All activities must be safely managed. You must complete a thorough risk assessment and take appropriate steps to reduce risk. Use the safety checklist to help you plan and risk assess your activity. Always get approval for the activity, and have suitable supervision and an InTouch process.
- Near water
Manage groups carefully when near water. The guidance on activities near water will help you to keep your group safe.
- Sharp objects
Teach young people how to use sharp objects safely. Supervise them appropriately throughout. Store all sharp objects securely, out of the reach of young people.
- Gardening and nature
Everyone must wash their hands after the activity has finished. Wear gloves if needed. Explain how to safely use equipment and set clear boundaries so everyone knows what’s allowed.
- Outdoor activities
You must have permission to use the location. Always check the weather forecast, and inform parents and carers of any change in venue.
- Visits away from your meeting place
Complete a thorough risk assessment and include hazards, such as roads, woodland, plants, animals, and bodies of water (for example, rivers, ponds, lakes, and seas). You’ll probably need more adult helpers than usual. Your risk assessment should include how many adults you need. The young people to adult ratios are a minimum requirement. When you do your risk assessment, you might decide that you need more adults than the ratio specifies. Think about extra equipment that you may need to take with you, such as high visibility clothing, a first aid kit, water, and waterproofs. Throughout the activity, watch out for changes in the weather and do regular headcounts.
- To make it harder, give people limited instructions, and let them figure out through trial and error how to place the twigs and tie them together.
- To make it harder, make the raft entirely from natural materials. Instead of cutting twine, gather long grass to cut to the right length.
People can work in pairs or small groups, if this works better for them.
If you don’t have access to a pond of river, use a sink, bucket or paddling pool in your meeting place.
All Scout activities should be inclusive and accessible.
Hold a competition to see whose raft can carry the most – use something friendly to nature, such as pebbles or more twigs. Why not try writing a message or a wish on a small rock, and letting it go?


